Setting up a Bastion host and a three-node cluster on Hetzner cloud using Terraform and Ansible
Infrastructure as code has a great benefit - you can make a cluster available in a few minutes. Then, switch the configuration with a few updates to the configuration. If you ever had long hours staring at blinking LEDs while it installed from a stack of CDs, you will know what a relief this is.
Terraform makes it possible to declaratively create the cloud infrastructure, supports all major cloud providers, and is easy to learn if you can spare an afternoon.
Hetzner is one of the most affordable and at the same time reliable cloud service provider. You can get a decent VM for around EUR 3 per month. That is just EUR 9 p/m for a small cloud.
Setup terraform on your local computer
If not done already, now is the time to set up terraform on your local laptop. The instructions at terraform website are fairly straightforward.
Create an SSH Key and add to Hetzner
You will need the SSH key to log on to your cloud servers. First, create a new ssh key.
ssh-keygen -f ~/.ssh/tcloud -t ed25519
Then copy the public key.
cat ~/.ssh/tcloud.pub
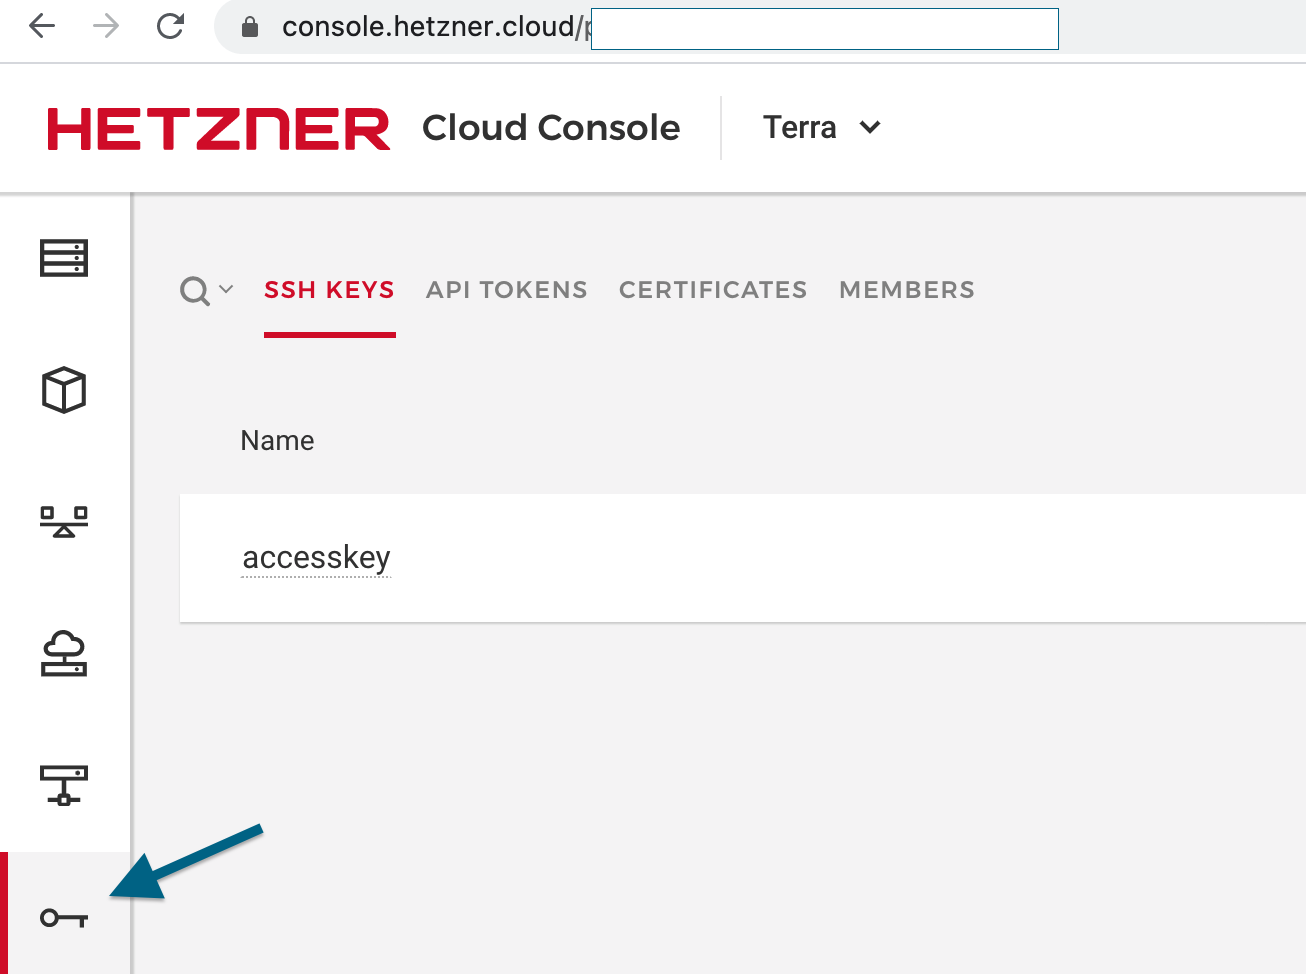
Go to Hetzner cloud console. In the left side panel, look for an icon labeled Security. Add the SSH key copied in the last step.
Get a Hetzner API token
In the same Security tab in the Hetzner cloud console, create
an API token. Copy the API token and keep it safe. You will have to set the environment variable HCLOUD_TOKEN to be this API token before running the terraform commands.
The network setup

The bastion host can be directly accessed remotely; The nodes can not be accessed directly from the public network.
The load balancer sends the traffic from the public network to the nodes.
Let us setup a network and a bastion host
The way we setup our cluster is like this: First, we setup a network for our cluster. Then we will have a Bastion host inside the network.

We will login only to the Bastion host and not to the individual nodes in the cluster. The Bastion host will in turn, connect to the individual nodes.
We will configure the firewall such that only the traffic from the local network is allowed for the cluster. Finally, we will set up a load balancer that will route the external traffic to the cluster nodes.
Let us now move on to writing some Terraform code.
On to the terraform code
You can clone the code from the OneCluster github repository.
See the 1-infra/modules/base folder.
There are 4 files.
The variables.tf file contains values that we can customize.
variable "bastion" {
    type = object({
        name         = string
        server_type  = string
        private_ip   = string
    })
}
For example, you can set the server_type variable to “cx11” that is the smallest VM type with 2GB RAM and 1 vCPU.
The variables can have default values. See that the private_ip_range variable has a default value. Makes it convenient when you use this base module.
variable "private_ip_range" {
  type=string
  default = "10.0.0.0/16"
}
The main.tf file contains the code that sets up our infrastructure.
This block of code sets up the network:
resource "hcloud_network" "private_net" {
  name     = var.network_name
  ip_range = var.private_ip_range
  labels = {
    name = var.network_name
  }
}

resource "hcloud_network_subnet" "private_subnet" {
  network_id   = hcloud_network.private_net.id
  type         = "server"
  network_zone = var.private_network_zone
  ip_range     = var.private_ip_range
}
Notice how the variables are used rather than hard-coding all the parameters.
The next part of main.tf creates a bastion node and connects it to the network:
resource "hcloud_server" "bastion" {
  name        = var.bastion.name
  image       = "ubuntu-20.04"
  server_type = var.bastion.server_type
  location    = var.hcloud_location
  ssh_keys    = ["accesskey"]
}

resource "hcloud_server_network" "server_network_bastion" {
  network_id = hcloud_network.private_net.id
  server_id  = hcloud_server.bastion.id
  ip         = var.bastion.private_ip
}
outputs.tf contains the output values from this terraform module. For the Base module, we will need the IP address of the bastion host.
output "bastion_ip"{
  value = hcloud_server.bastion.ipv4_address
  description = "Bastion Server IP"
}
The code in the folder 1-infra/modules/base is a reusable Terraform module. We will now write the code that uses the module, customizes the variables and builds the infrastructure.
See the file: mycloud/base/main.tf In the first part, we specify the infrastructure provider “hcloud” Then initialize our “base” module. We have to provide values for all the variables that does not have a default value.
terraform {
  required_version = ">= 0.13"
}

provider "hcloud" {
}

module "base" {
  source = "../../modules/base"

  bastion ={
    name = "bastion"
    server_type = "cx31"
    private_ip   = "10.0.0.2"
  }
  network_name="mycloud-main"
}

output "bastion_ip"{
  value = module.base.bastion_ip
  description = "Bastion Server IP"
}
Create the Base infrastructure.
Now that the code is ready, let us setup our base infrastructure. Make sure that the environment variable “HCLOUD_TOKEN” is setup to be the API token from Hetzner.
Then run the command
cd ./1-infra/mycluster/base
terraform init
Using a bash script
Alternatively, you can make use of the bash script run.sh . Create a file named .env Then save HCLOUD_TOKEN in the .env file like this:
HCLOUD_TOKEN=asjdfhkjsdhfjdshkjhfkdsjhfkjdshfkjdshkjhfkj
Run the script like this:
./run.sh init base
You can see the corresponding code in the bash script
function initBase(){
   cd ./1-infra/mycluster/base
   terraform init
}
Once the initialization is done, run the “apply” command
cd ./1-infra/mycluster/base
terraform apply
If everything goes fine, this should build the base network and print out the IP address of the bastion host.
(Alternatively, using the bash script: ./run.sh deploy base )
Try logging on to the bastion host through SSH. Use the IP address from the previous step. For example:
ssh -i ~/.ssh/tcloud root@115.103.34.228
Set up a 3 node cluster
Now that we have a base infrastructure setup, let us build a 3 node cluster. See the modules/hcloud folder
Let us start from main.tf:
data "hcloud_network" "private_net" {
    name = var.network_name
}
First we get the network name from the variables and use it to initialize the network for this module.
The next block of code builds the cluster nodes(servers)
resource "hcloud_server" "cloud_nodes" {
  for_each = var.nodes

  name        = each.value.name
  image       = "ubuntu-20.04"
  server_type = each.value.server_type
  location    = var.hcloud_location
  ssh_keys    = ["accesskey"]
}
foreach runs a loop.
Let us quickly switch to the variables.tf file to better understand how this foreach works.
variable "nodes" {
    type = map(object({
        name         = string
        server_type  = string
        private_ip   = string
    }))
}
The variable in this case is a “map”. The name of the variable is “nodes”. Each of the element contains an object with values: name, server_type, and private_ip variables.
Back in the foreach loop, we can access the name like this: each.value.name and the server_type like this: each.value.server_type
Let us see how the values are passed in mycloud/prod/main.tf
module "cluster" {
    source = "../../modules/hcloud"

    nodes = {
        1 = {
            name = "node1"
            server_type = "cx21"
            private_ip   = "10.0.0.5"
        }

        2 = {
            name = "node2"
            server_type = "cx21"
            private_ip   = "10.0.0.6"
        }

        3 = {
            name = "node3"
            server_type = "cx21"
            private_ip   = "10.0.0.7"
        }
    }
}
Now that we have the nodes setup, we can add additional components to our cluster. Let us first add a small volume to each node. Volumes is like a virtual Hard Disk. Having a separate HDD for application data is convenient. Here is the code:
resource "hcloud_volume" "volumes" {
  for_each = var.nodes

  name = "${each.value.name}-volx"
  size = 10
  server_id = hcloud_server.cloud_nodes[each.key].id
  automount = false
}
This block of code also runs a loop because we want to add a volume to each of the nodes in the cluster. Notice that I hard-coded the size of the volume. (size = 10). Not a good practice. I should have used a variable.
The other interesting line is where it makes a name for the volume here
name = "${each.value.name}-volx" That line just combines the name of the node and makes it easy check which volume corresponds to which node.
Connect the node to the network
The next block connects each of the node to the network and sets the private IP address of the node.
resource "hcloud_server_network" "server_network" {
  for_each = var.nodes

  network_id = data.hcloud_network.private_net.id
  server_id  = hcloud_server.cloud_nodes[each.key].id
  ip         = each.value.private_ip
}
Load balancer
We will need a load balancer to distribute the external traffic to the nodes in the cluster.
Here is the code to setup one:
resource "hcloud_load_balancer" "load_balancer" {
  name       = "${var.cluster_name}-lb"
  load_balancer_type = var.load_balancer.type
  location   = var.hcloud_location
  dynamic "target"{
    for_each = var.nodes
    content{
      type = "server"
      server_id= hcloud_server.cloud_nodes[target.key].id
    }
  }
}
We will also add the load balancer to our private network. Remember we allow only local traffic for the nodes in our cluster. So the load balancer will only communicate through the private IP address of the nodes in the cluster.
resource "hcloud_load_balancer_network" "server_network_lb" {
  load_balancer_id = hcloud_load_balancer.load_balancer.id
  network_id = data.hcloud_network.private_net.id
  ip = var.load_balancer.private_ip
}
Setup a cluster
We have the module ready that can create a cluster in our private network. See the code in the folder: mycloud/prod
In the first part we initialize the map of nodes for the cluster:
module "cluster" {
    source = "../../modules/hcloud"

    cluster_name = "prod"
    network_name = "simfatic-main"

    nodes = {
        1 = {
            name = "node1"
            server_type = "cx21"
            private_ip   = "10.0.0.5"
        }

        2 = {
            name = "node2"
            server_type = "cx21"
            private_ip   = "10.0.0.6"
        }

        3 = {
            name = "node3"
            server_type = "cx21"
            private_ip   = "10.0.0.7"
        }
    }

    load_balancer = {
        type="lb11"
        private_ip="10.0.0.3"
    }

    hcloud_location = "nbg1"
}
You may have noticed that making a separate module makes it easy to build clusters of different size and shapes. You can add more nodes in the main.tf to build a larger cluster. You can change the server-type variable to vertically scale.
There can be many cluster setups each one for a different purpose. For example the cluster staging can be used to run tests on apps just about to be released. A dev-cluster can be used for development time tests. Any of these clusters can be stood up on demand.
Output
output "nodes" {
  value = module.cluster.nodes
  description = "Node Details"
}
output "load_balancer"{
  value = module.cluster.load_balancer
  description = "LoadBalancer IP"
}
The output configuration provides the external IP addresses of the nodes and the load balancer. We can uses these IP addresses in the next step - that is to provision the nodes using Ansible.
Build a cluster
go to the folder run terraform init
cd mycluster/prod
terraform init
Then run terraform apply
terraform apply
Destroy the cluster
Once you have the terraform code working, you are ready with the “infrastructure as code”. You can build the cluster on demand any time you want. That also means that you can destroy the ones that you don’t need. In order to destroy the test cluster run the command
cd mycloud/prod
terraform destroy
to destroy the base setup:
cd mycloud/base
terraform destroy
Next steps
It is only the bare nodes that we have setup so far. Before you can run any useful application on this cluster, you need to provision these nodes. For example, setup user and admin accounts, Firewall, SSH so that the admin user can login, so on and so forth. Fortunately, Ansible makes the setup pretty easy just like terraform made it easy for the infrastructure. It is the topic of discussion for another session.